New and refurbished ideas for LDS Primary Music Leaders (a.k.a. Primary Choristers)
Showing posts with label Choose and Review. Show all posts

Saturday, December 22, 2012

CAROLING AROUND THE PIANO

A fond memory I have from my youth for Christmas is the family gathered around my mom at the piano singing the many beautiful Christmas songs. I have translated that wonderful memory into my Primary version of
Caroling Around the Piano.
I've done this before in my Primary and the kids have loved it, so I plan on doing it again this year after we practice the Christmas song we will be singing next Sunday in Sacrament Meeting.

"Caroling Around the Piano" is pretty easy to do. Just roll the piano to the front of the room, if possible, and have the children gather around it. I prefer the JR to sit around the piano and the SR to stand. If you prefer, you could just have the children stay in their seats. And then we sing. That's basically it. I have used some different methods in determining which songs to sing to add some extra fun. Here are a few ways:
  • Have some ornaments on a little tree to pick from or gift bags/boxes with songs or a nativity set to select and put together on a table.
  • Let each class choose a favorite Primary Christmas song or Hymn. I do this for SR but not JR.
  • This year I am going to have different bells with tags on them with a song and a way to shake the Jingle Bell Jingles found here as we sing for JR. For this activity I don't use the Jingle Bells for SR since they will be using the Christmas songbooks I made.
For SR we use my Christmas songbooks that I made years ago for my family caroling time. You could use Hymnals, but it is quite a chore to round enough of them up. To make these, I made copies of Christmas Primary songs and hymns from the LDS web site found here for Primary songs and here for Hymns, for each book I wanted to make. I have also typed up the words for some secular songs for the back of the book that we sometimes sing with the young kiddies in my family but I do not use/sing them in Primary since I don't feel Sunday church is an appropriate place for singing these type of songs especially since they are not church approved. I also made a cover sheet and divider sheets to separate the Primary songs from the hymns as well as the more secular songs. I've included the file I used for the dividers in case you don't want to make your own. (I can't believe I still had the file.) These books have held up really well over the years and I just gently remind the kids to treat them respectfully so they can last a long time. I have about 30+ of these made since I use them for when my extended family gets together at Christmas, which sometimes can be quite the crowd, so there are plenty to go around the Primary. 

For this year, I want to close singing time with the lights off and use a lamp for some ambient lighting while we sing "Silent Night". As an extra special treat, my pianist will bring her guitar to play. She is such a great pianist and she tinkers with the guitar and is willing to strum a few chords for us while we sing. I'm hoping that will set a reverent mood so I can leave them my testimony of the wonderful gift our Heavenly Father gave us when he sent Jesus Christ to be our Savor.

Ahhh! What would Christmas be without Christmas Caroling! 
I wish you all a wonderful Christmas!


Friday, November 23, 2012

MUSICAL MISSIONARY

I like to have at least one singing time a month that goes along with the monthly theme. For this month's theme "I Can Choose to Be a Missionary Now" I am getting my inspiration from this Month's "Bringing Primary Home: I Can Choose to Be a Missionary NOW" in the Nov. 2012 Friend.  I just thought the speech bubble Q&A idea would be fun to use in Singing Time.  I'm also getting inspiration from the Sharing Time Idea #4 in the Oct 2007 Friend. 


Basically I'm going to tie in the missionary theme by briefly
talking about how the songs we learn in Primary teaches us about the gospel and when we learn these gospel principles, we are able to be a missionary now by sharing these things. I'm also going to read some portions of the preface in the  Children's Songbook to help emphasize this. Keep the talking part to about a minute.  I will be doing the singing portion a little different for my JR than my SR group.

JR

  1. (Setup) Have the picture of the boys posted in the center of your board. You can print the one page version or if you have a large Primary, you may want to print only that page larger in poster format. You can click on the "How To Helps" tab above for how to print in poster format. Just make sure you only have that page selected to print so it doesn't try and print all the pages in poster format.
  2. (Setup) Have the song/answer speech bubbles posted randomly around the room or on the outside edges of your board for the children to select from.
  3. Explain to the children that this boy (pointing to the boy sitting back on the bed-you could give the boys names if you want) has lots of questions to ask us and we are going to help this boy (pointing to the boy holding the scriptures) answer those questions by thinking of which Primary songs will help answer them. Point out you have several songs around the room that they can choose from.
  4. Post the first question speech bubble next to the boy sitting back on the bed and ask the Primary the question. Let a child select a song/answer speech bubble to put on the board by the boy with the scriptures.
  5. Sing the song. Ask them to listen to the words as they sing to find the answer.
  6. Repeat steps 4 & 5 for as long as you have time for.

SR
  1. (Setup) Have the picture of the boys posted in the center of your board. You can print the one page version or if you have a large Primary, you may want to print only that page larger in poster format. You can click on the "How To Helps" tab above for how to print in poster format. Just make sure you only have that page selected to print so it doesn't try and print all the pages in poster format.
  2. Explain to the children that this boy (pointing to the boy sitting back on the bed-you could give the boys names if you want) has lots of questions to ask us and we are going to help this boy (pointing to the boy holding the scriptures) answer those questions by thinking of which Primary songs will help answer them. Here are some variations of how the SR can figure out the songs.
    1. Just let them think of songs from their memory.
    2. Give them a list of songs to select from combining the ones you have chosen as well as others.
    3. Give each class/group a copy of the topical song guide from the Children's Songbook to find a song.
    4. Give each class/group a copy of the Children's Songbook to look through.
  3. Give each class one or two of the question speech bubbles (depending on how many you have in your Primary and how much time you have). You could just type the questions on paper and cut them out to hand them out and you post the speech bubbles later as you go through them. Give them a few minutes to find a song to answer their question. Let them know they also need to know the part of the song that answers the question the best. You could also give them a hint by letting them know that these are songs they already know.
  4. When time is up, post the first speech bubble question. Have a spokesperson in the class that had that question come up and give their song title and the part of the song that answers the question. You can post the answer speech bubble if you like.
  5. Sing the song. Ask them to listen to the words as they sing to ensure they have the right answer.
  6. Repeat steps 4 & 5 for as long as you have time for.
  7. Your kids may come up with other songs than you and that is all right. You can sing that song if your Primary knows it and/or you can show them another song you thought of.
Let them know that there are many ways to be a missionary and share their testimony and sharing their testimony through song is a wonderful way they can do it.

Another way you could present this is how it is suggested in the Sharing Time Idea #4 in the Oct 2007 Friend, by having someone come in and be an investigator.

For the attached visuals, select the song speech bubbles you would like to use and print and cut out. I've made probably more than what you will have time to sing. For the Book of Mormon question, I've done a speech bubble for a song I taught my Primary for last year's scripture theme.  It is Hand in Hand Together from the May 2001 Friend magazine. My kids really love this song. I'll have to post the visuals for this sometime. If your Primary does not know that one, you can do "The Golden Plates". For the prayer one I've done a separate one for Jr & SR. I've also made blank speech bubbles as well in case you want to come up with your own, or you can print blank ones for your SR kids to write the song titles in to post on the board. Just note which speech bubbles point toward the boy with the questions and the boy with the answers so you have them pointing in the correct direction.


Musical Missionary

Saturday, November 17, 2012

TURKEY SPIN


               HAPPY      
     THANKSGIVING!!!


Here is another way to use the  Big Wheel Spinner I made here. I know this wheel spinner isn't something many of you will make, so I do have another option I'll tell you about later.  


This is how I made this Turkey Spinner

  • Cut out some small sized feather shapes from various colored card stock and adhere permanently to the back of the turkey so that the turkey isn't so "naked" by the time the other feathers are pulled out.  Laminate the combined body and feathers. Decorate the feathers making a squiggle line with glue and glitter.
  • Cut out some medium sized feathers from various colored card stock, laminate and attach popsicle sticks to the bottom of the feathers so they can be inserted into the styrofoam turkey body.  Decorate making a zig-zag line along the top of the feather with glue and glitter.
  • Cut out some large sized feathers from various colored card stock and laminate. Decorate making a swirl design at the top of the feather with glue and glitter. Adhere two square pieces of the loop side of Velcro on each of the corners of the feathers on the back side. Leave the hook side attached to the loop so it is easier to know where to place the hook side on the spinner. Attach the large feathers on the spinner equally. Make sure your feathers are short enough to allow a space in the center for where the turkey body will be attached.
    • I don't have a template for the feathers to give you. The shape is just a rounded, rectangular teardrop I freehanded at the time. The size would depend on your spinner. I did eight feathers for each size.

Small feathers and turkey
Medium feathers
Large feathers


  • Turkey Body
    • Print and cut out the turkey body. File attached. Attach the small feathers to the back and laminate. See small feather instructions above. After it has been laminated, you can glue on some large google eyes. It gives it a more fun and animated.
    • Get a round styrofoam disk about 6" x 1 1/4". With some brown craft paint, paint around the edges and about an inch into both of the flat sides of the disk—you could paint it completely, but it will be covered with paper anyway.
    • Back side of disk
    • After the paint is dry, glue a circle of brown card stock on each side with a hot glue gun. The paper gives the Velcro something to stick to.
    • Take a 2" strip of clear Velcro and cut lengthwise down the center so you have 2 long, skinny strips. Adhere both of the loop sides (soft & white side) of the Velcro strips to one side of the disk.  Leave the hook side (clear & rough) of the Velcro mated to the loop side. Remove the release liner of the hook side of the tape and adhere it to the spinner wheel in the center. The Velcro allows it to be removed so the spinner can be used for other games.
    • Take a square piece of clear Velcro and attach the loop side to the front of the disk in the center. Leave the clear, hook piece mated to the loop. Remove the release liner from the hook side of the square piece of Velcro on the front of the styrofoam disk and center and attach the turkey and small feathers that have been laminated together onto the styrofoam disk.
  • Insert the medium sized feathers with the popsicle sticks around the styrofoam disk. They will be between the large feathers on the spinner and the small feathers on the turkey.
HOW TO SPIN AND SING
  • If laminated, use wet erase markers to write on the back of the large feathers the songs and page numbers to sing.
  • On the back of the medium feathers with wet erase markers, write "how to sing" the song, e.g. clap to the rhythm, staccato, fast/slow, your teacher's favorite song, etc.
  • Let two children come up and each takes a turn to spin. One spins for the song and one spins for the "how to sing".
  • Now, spin away!!!

I've attached a file with a turkey body and some ovally-shaped feathers if you want to just make a turkey that you can post on a board and have the children pick feathers from to choose songs. You could leave the feathers off and scatter them on the board or around the room and have the children pick/find a feather, add it to the turkey, then sing the song. There are colored feathers if you want to print on colored card stock or a black and white one you could use to color them in yourself. Just print how many feathers you want your bird to have.

Instead of a poster, another option, if you want more of a 3-D look, is to get a bigger and fatter styrofoam disk or ball, cut in half and paint, adhere the turkey you've cut out, use smaller pieces of popsicle sticks to adhere to the bottom of the feathers and pluck the feathers out or stick them in the turkey for the songs. You may have to weigh the styrofoam down a little so it won't topple over as easily.

I'll post another way I used this with a Sing-a-Story next.


Tuesday, August 21, 2012

BACK-TO-SCHOOL REVIEW IDEA


Ahhhhhhhhh!

It's that time of year when children's excitement explode with anticipation of school and in wonderment of who will be their teacher, what classes they will have, which friends will be in their classes and of course, the joy of getting new school clothes and school supplies. I don't know why this is, but I just love school supplies. Yep, there is nothing like having a fresh box of 

crayons
with all their little pointy ends just waiting to touch a fresh piece of paper to see what will be created.

Here is an easy "Back-to-School" idea I did a couple of years ago to help review some of the program songs that needed some work or maybe you just have a song or two you need to work on over-and-over again. This can work for that too; just take turns repeat singing the song you want to work on doing the singing activity according to the school item chosen each turn then moving on to another song after you feel they have sung that song enough times and are ready to move on. If you choose to do all the program songs instead of a select few, this activity will probably last you a couple of weeks. You probably have several, if not all, of these school items around the house.

HOW
  1. Grab a backpack or a school box that you will fill with some school supplies for the children to pick from.
    1. If your backpack has several pockets, put an item in each pocket for the children to select from.
  2. Select a school supply for each song you plan to sing or have time to review if you are doing repeat singing on a song. See list below.
  3. Assign a song to each school item you've chosen unless you plan on just singing one or two songs for repeat singing. 
  4. Take turns having a child pick a school item from the backpack or box.
  5. Sing the song according to that item's activity. 
SCHOOL SUPPLIES AND ACTIVITIES (key sheet downloadable below)

Book: A mini Children's Songbook would be great to use for this. Have a few bookmarks placed in the songbook under some selected songs (or written on the bookmark if you are not using the songbook) and have the child pick one of the bookmarks. Then sing that song. Instead of bookmarks, you could have the child pick their favorite song to sing. Another option is to have the children "read" the song by saying the words instead of singing.

Calculator: Choose a word in a song that is used several times and have the children count how many times that word is sung in the song. Have the JR hold their hand(s) up while they sing and count on their fingers. For SR, at the end of the song, have them hold up the number on their fingers when you ring the bell to see how many are right.

Crayons or Markers (set of 8-10 colors): Hold half the colors in one hand and the other half in the other hand. When one hand with the crayons/markers is held up, the children wearing those colors sing while the other children hum, la-la or oooooo and vice-versa with the other handful of colors. Take turns switching between colors. You could just select a few colors for each hand if you prefer.

Eraser(s): "Erase" one or two words from the song by not singing them. Preselect the word(s) in the song you want to omit from singing. If there are 2-3 words to select from, then you could write each of the words on a different eraser and have the child pick one to determine which word to omit. This is a good one for a sign language song; although they would omit singing the word, they would continue doing the sign language.

Flash Cards (Directional Singing Bird Cards): Put several of the Directional Singing Bird Cards in a stack and as you flash the cards over, the children sing according to the flash card. You may want to manually sort them in the stack to help control the order for how they sing.

Glue: Have them "glue" themselves in some pose that they have to hold through the song or for a more reverent song, have them glue their hands together or arms in a folded position.

Magnetic Letters: Have a child pick a letter from the little bag or box you have the magnetic letters in and while singing, they must omit singing each word that begins with the letter that was picked. In preparation for this one, look ahead at the song you have chosen for this activity and select several magnetic letters to put in your container that have several words using those letters in the song. This would mainly be for SR's since this would be a little difficult for the JRs.

Notebook of Paper: Pass out a piece of paper to each child from the notebook and have the children snap the paper to certain words, for example for the song "Choose the Right" you could have them snap the paper whenever they sing the words "choose the right", or they could play their piece of paper by holding it in one hand and hitting it with the fingers from the other hand to the beat of the song while they sing.

Notepad and Pen or Chalk or Small Dry Erase Board and Marker: Give the notepad and pen, piece of chalk or dry erase board and marker to a child. While singing, randomly stop the song and the child must write what the next word is on the notepad, chalkboard or dry erase board. Pick up singing where you left off and repeat stopping another time or two during the song. Have the child write down each word after each stop and check it after you finish the song or you could have a different child come up each time.

Pencils: Have a pencil for each child to pitch lead or conduct with as you sing. You could let the children keep the pencils afterwards.

Pencil Sharpener: Sharpen the words in the song by enunciating each word as you sing while slightly exaggerating the mouth.

Ruler: Who rules? Boys or Girls? Have a boy and a girl come up front. When you point to the girl with the ruler, the girls sing. When you point to the boy, of course, the boys sing. The girl and boy who represent the teams must of course also be singing to help represent their group. Another option is to have the girls and the boys each take turns singing the song separately to see who "rules". Or another option is that you could measure the volume by moving the ruler up and down: raising the ruler to increase the volume (crescendo), lowering the ruler to reduce the volume (decrescendo) or moving it to mid point for normal volume.

Scissors: Have everyone stand still while singing and as they sing you walk around "cutting out" the non-singers and wigglers by tapping them on the shoulder or head to sit down, but they need to keep singing. For SR I like to make it more challenging and to help prevent the goof-offy kids from wiggling on purpose so they can sit down by telling them that any that get "cut out" get the privilege to come up front and be a mini choir and re-sing the song.

Toy: Jump Rope, Ball or Other Small Toy = Recess Time: You will need a bell for this. When the bell rings, the children take a "recess" from singing the words and then when it rings again, they pick up singing the song where the music is. (The music continues playing when they are on "recess", so they have to keep singing it in their heads so they know which word they are on when they start singing again when "recess" is over and the bell rings.)


Remember, if you have the children control these school items for the singing activities instead of you controlling them, give them the rule of 6, 5 or 3 (for short songs). They can't switch more than that number of times in the song and they have to count to at least that number before they can switch again. For JR I don't have to use this rule, but I always do with my SR kids because there are some of them that just think it is so funny to keep switching back-and-forth quickly as many times as possible. (Well, okay, it is funny, but a bit difficult to sing.) I gotta keep ahead of those smartie-pants. 

OTHER IDEAS TO ADD A LITTLE MORE "SCHOOLING" EXCITEMENT IF YOU FEEL LIKE IT
  • You can also give them a grade on the song for how well they sang it while doing the activity. Write the song and grade up on the chalkboard to make it more school-like.
  • You could ham it up a bit by putting your hair in a bun or clip and sticking a couple of pencils in the bun. You could also put on reading glasses to give you more of a "teacher" look. I also like to throw on one of those eyeglass necklace chains that go on glasses so I don't have to wear the reading glasses the whole time since I don't wear glasses and I would get dizzy if I had to keep looking through the reading glasses; I just like to have the glasses hanging from my neck.
  • If you have one of those desk bells, you could ring it before picking the next child to pick from the backpack. You could even tell them that when they hear the bell, they need to sit at attention with their arms folded so you can pick the next child. Just a little extra added bonus to help maintain reverence.
  • You could even keep in theme with this month's song by having each child that comes up to pick share something they have done or can do to be like Jesus before they pick from the backpack.
  • Have a basket of apples and hand out an apple to each teacher at the end of singing time.
  • You could also add the "Spec—tacular Singing Sunglasses" idea to this by having another child guess the omitted word in SR Primary or the loudly sung word in JR Primary. You could even remove the dark lenses on a pair so they look more "wordy—nerdy".
  • To help choose the helpers, you could tape numbered cut outs of apples under the chairs and have the children look under their chairs. Those children that get an apple under their chair are your helpers starting with #1. Or, if you have metal chairs, you could put some of those magnetic alphabet letters under the chairs and you would call you helpers up as needed starting with the letter "A". Only use one letter of each in the alphabet though.
  • I like to set up my little table I use in Primary (that usually holds all my singing time paraphernalia) like a desk with my bell, finger pointer stick, basket of apples, pencil cup filled with the pencils I will use for pitch leading/conducting, stapler and the backpack.
Well, I hope that gives you some fun Back-to-School reviewing ideas.


8/25/12 9:00 pm
I've updated the key sheet to include one I forgot and I added another. 
Back to School Singing Key Sheet Nalani

Friday, July 27, 2012

PRIMARY SINGING OLYMPICS: SUMMER GAMES

Of course with the Olympics starting this week, you can't help but think about doing a Primary Singing Olympics. A couple of years ago I had worked on a winter Olympic version, but I think I got sick and had to scratch it . . . so I'm excited for another chance. I have seen a variety of ideas over the years for doing an Olympic Singing Time and have borrowed from the many great ideas out there as well as I have added many of my own twists and turns to it as I am most often inclined to do. This is pretty simple to do and I think it will be a fun way to review the program songs. With it being the 5th Sunday of the month, I do have the whole Singing and Sharing Time, but this can be adapted for a regular Singing Time or you could even take a couple of weeks to do it.


You can't have a Primary Singing Olympics without a torch, so I plan to start off bringing my torch out with a quick blurb about the Olympics and how hard these athletes work for years to come and perform at the Olympics and then tie it in with how hard we have been working on the songs in preparation for the Sacrament Meeting Program. 


Of course, we have to have the all important 
Torch Relay, so I will have the lights turned off while my torch is lit while we sing the song (I will also have a battery powered lantern for an extra light source since our Primary Room is quite dark with the lights out—and don't forget a light for your pianist) and as we sing the song standing up, the children will respectfully and reverently pass the light to each other down the rows. The last child will bring the torch back up to me and then I can set it on the table in its base.


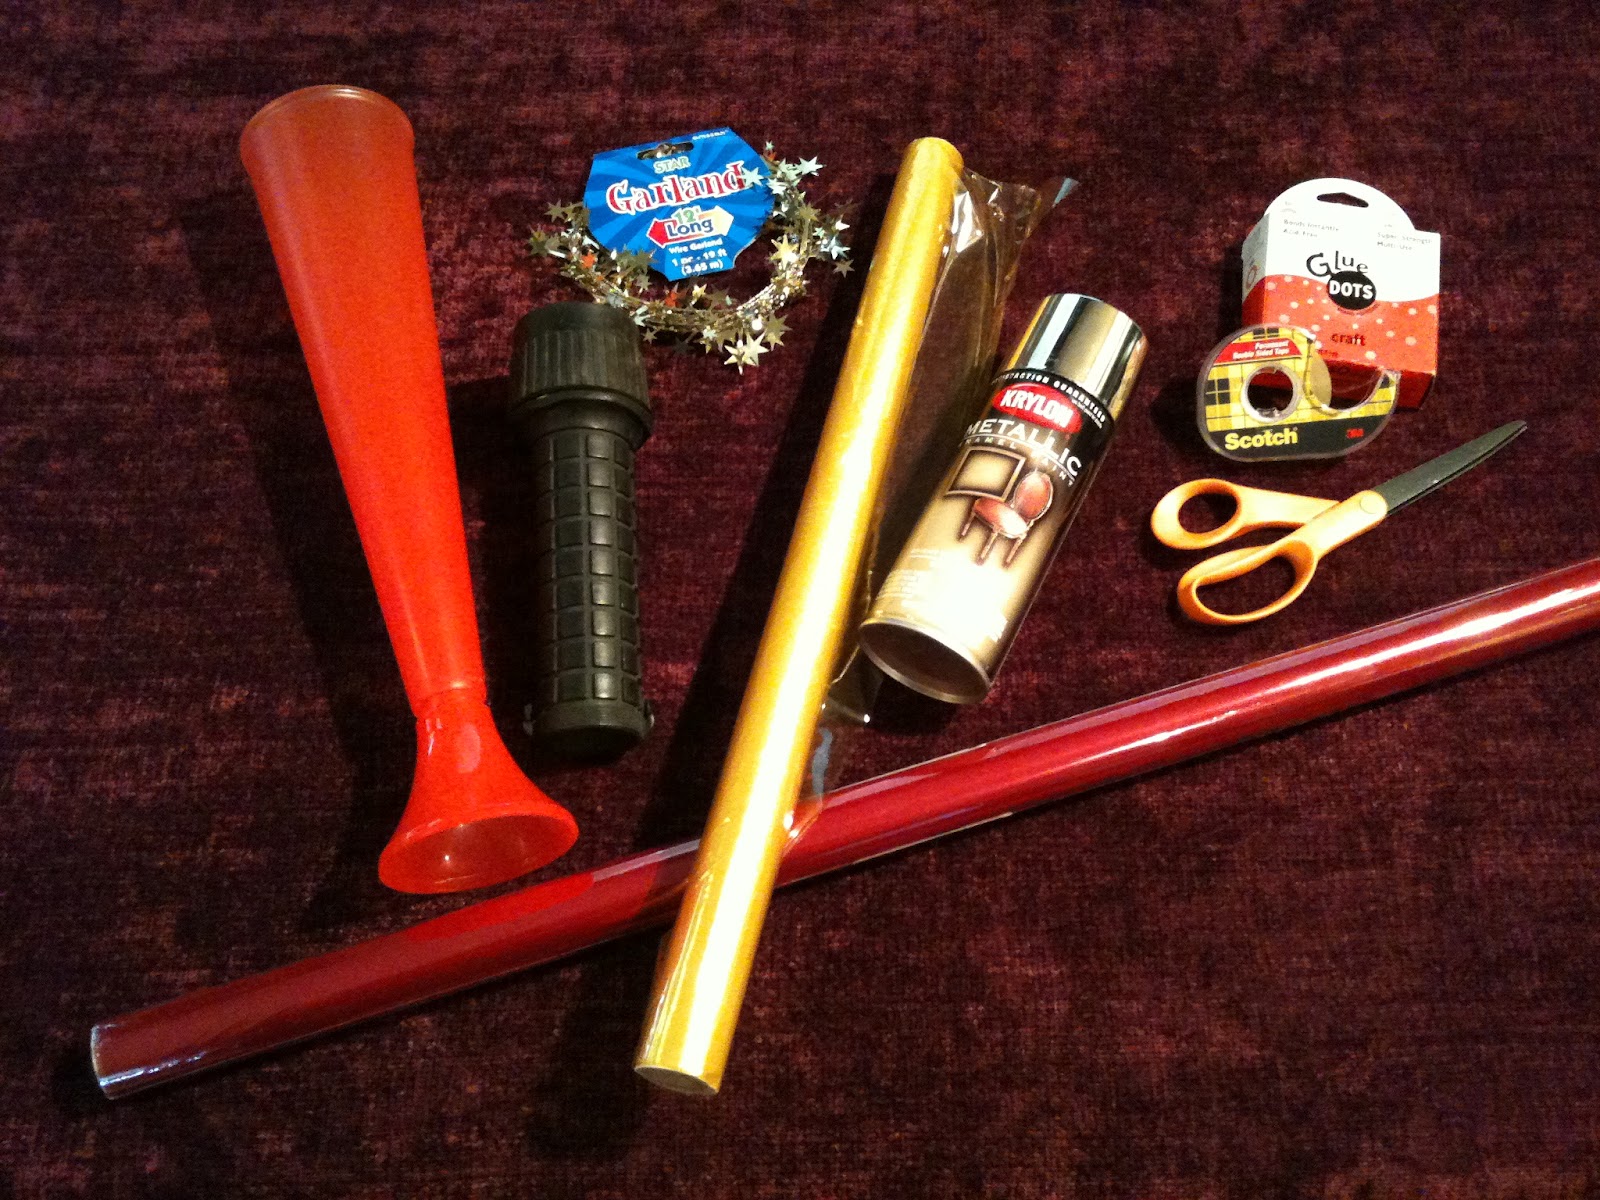
Ignore the garland in the picture. I decided not
to add it to the torch but do if you want some sparks.
Red and yellow cellophane wrapped and pleated
around the head of the flashlight. 
The torch was pretty easy to make with found objects around the house. This is how I made mine with what I had. Revise with what you have.

  1. Unroll about 14" of the yellow cellophane roll and cut off.
  2. Tape about a 1" piece of double-sided tape to the base of the head of a flashlight and adhere one end of the cellophane to the tape on the flashlight. Then make a pleat and tape it down.
  3. Continue taping the cellophane down on the flashlight head and pleating as you go around the flashlight. This will help to puff out the flame a little so your flame doesn't look like a column of fire.
  4. Make some small snips in the top to give it some small flames. You should be able to still unscrew the top of the flashlight from the handle in case you need to put new batteries in.
  5. Unroll and cut off about a 12" strip of red cellophane and cut out some triangle-shaped flames along the cut edge. Be careful because these can tear off easily. Had to fix a couple that tore on me.
  6. Tape and pleat the red cellophane around the flashlight head like you did the yellow cellophane. You could use tissue paper if you don't have any cellophane, but cellophane will let the light show more, but then again, you don't even need to use a flashlight. You could just use a paper towel tube.
  7. Leave the flashlight handle as is or wrap gold paper or foil around the handle to give it a more torch-like look and you are done OR
  8. Instead of wrapping it in gold paper, put the flashlight in a gold, tall, plastic drink cup. I stopped in the $ Store several days ago when I was running an errand in the same strip mall and I happened upon a tall cone-shaped drink cup there that would be perfect for the torch. I was sooooooo trying to figure out something that would hold the torch upright on the table and this had a base at the bottom that would do it perfectly and I can pull the base off if I want to when I am holding it like a torch. I was so excited by the cheap find. I just spray painted it with some leftover gold paint I had on hand—less than 5 minutes. TIP: put it on a stick while you paint so you don't get paint on your hands.
  9. With the cellophane flames on the flashlight, just turn it on and drop it into the torch cup and voilà!  An Olympic Torch! It does look pretty cool with the lights off.
Singing Sport Sign Example


I will have my Primary Singing Olympic sign posted at the top of my board (pictured at the top of this post.) If you want the Olympic sign a little bigger, you could print that page in poster format on two or more pages. I did mine on two pages. Then I will have my Singing Sport Signs for the different sports posted on the board underneath it. The link to all the files I made are posted below. I will have a child pick one of the sports and we will sing the song assigned it while doing the "sport" activity. You could also just post the signs in the order you want to do them in and proceed in that order. I have to admit that I kind of got carried away during my brainstorming session when I was going through the list of sports that are in this year's Olympics and trying to think of names for the sports and activities. I did some "singing" word play on the sport names. I know the kids may not get them all, but the teachers might think they are fun and I had fun thinking of them. During my brainstorming, I ended up with WAAAAAAAAAAAY more sports than you will ever do for your singing time and I created signs for each one as well, so at least you have quite a variety to pick from. Just select the singing sports activities you want to do for the time you have. I've also attached a key sheet file for the sports and songs. Just select which sports you want to do and write in the songs you want to do on the key sheet. You could even just write what the song is and activity on the back of your sign if you don't want to refer to a key sheet. Don't forget to take any items/props, if needed, for each sport activity you have chosen. I've tried to keep the props simple to none. If there are any props needed, I've listed those items in each section on the key sheet.  Here is a list of the songs and sport activities that I am thinking of doing:


TORCH SONG RELAY: If the Savior Stood Beside Me
RHYTHMIC RIBBON: When I Am Baptized
SYNCHRONIZED SINGING: Nephi's Courage
SHOT PUT IN ORDER:  Choose the Right
ARCHERY ARTICULATION: The Wise Man and the Foolish Man
TENNIS WORD: Dare to Do Right
SAILING SERENADE: As a Child of God
TRAMPOLINE TRIPLE TIME:  Stand for the Right
VOLLEYBALL VIRTUOSO:  I'm Trying to Be like Jesus
MOUNTAIN BIKE MEDLEY: Stand for the Right and Dare to Do Right Medley


Probably won't have time to do all 10, but I'll be prepared just in case with the last two.


I tried to use most of the actual olympic pictograms for the signs but many of the sub-categories didn't have any, so I just created my own, so many are not the official pictograms in case you were wondering. Although I don't care for the Olympic font London chose, I used it anyway for a more authentic look.  I tried to do a variety of "sport" activities; however, don't expect them to be these big running, relay type of sport activities for the children to do. I find too much playing around type activities make it difficult to keep some semblance of reverence as well as the children get too busy "playing" instead of singing, so I try to select activities more conducive for singing that the children enjoy doing but still gives them some movement, variety and a challenge. There are a few more "sporty" events on the list just in case you want to throw in one or two for a moment or two of added play time.


I also plan to have someone be a judge; maybe one of the presidency members or maybe take turns having the teachers help judge. This is optional, but kids seem to like to perform well when they are being watched. I will give the judge three paddles: GOLD MEDAL, SILVER MEDAL and BRONZE MEDAL. They are the big medals in the file that I have cut out and attached to tongue depressors. If the children sing the song/verse well, the judge will hold up the GOLD MEDAL after they sing. If they sing okay but the song still needs some work, then the judge would hold up the SILVER MEDAL paddle. If we could really use a bit more work on the song, then the judge would hold up the BRONZE MEDAL paddle. Oooooo, I sure hope we don't earn too many bronze medals!


If the song has more than one verse, I plan on only having them sing the first verse then stop to be scored by the judge, then sing the second verse, stop and be judged and so on. Whatever paddle the judge holds up, I will put up a smaller version of the medal next to the Singing Sport Sign. So, if there are three verses to a song, there should be three medals next to that sport sign when done to reflect how we did on each verse. This will be a fun and incentive way for everyone to see how many gold, silver or bronze medals they have earned as well as it lets you know what needs more work. I've included in the file all three versions of smaller medals as well as a black and white version if you would prefer to print on colored paper instead of in color or print on white and just color them in. Just print and cut out how many scoring medals you might need for the number of songs/verses you plan to sing.


I haven't brought a treat all year, but I decided to for this activity because you just can't have an Olympic event without a medal, so of course I've done the obvious GOLD CHOCOLATE COIN that I hot glued some blue curling ribbon to. If you don't want to do an edible treat, I've included little gold medals that you can print on gold card stock, punch out and tie curling ribbon or yarn to make a gold medal.


Another gold medal option would be is to wrap a cookie in gold foil and then glue ribbon or yarn on it.


Hope you have some
OLYMPIAN SINGING FUN!!!

Primary Singing Olympics—Nalani


Primary Singing Olympics Key Sheet-Nalani

Saturday, July 21, 2012

WAGON WHEEL SPINNER

I know many of you probably have your Sunday planned, but if you are still looking for something to do, here is a fairly easy pioneer singing time to do or save for next time. (Sorry, another busy week with so many family get-togethers on top of the extra work load at work—a great employee from my department was rushed to the hospital for brain surgery for a brain tumor, so I didn't get the chance to post all I wanted to this week.) I still have other visuals for more pioneer songs to post...sometime.


Anyway, if you are really ambitious, you can make a wooden wheel spinner that I just posted about here to use with the wagon wheel or if you only have a little time to prepare, you could just draw and use the poster wagon wheel or...you say you have no time at all? Well then, just print and cut the pictures in the file and post on the board or let the children pick from a container.


I did this last year, but with the very busy week I've had, I'm pulling it out this year again, but with a few changes. I'm also going to combine it with the 
Campfire Singing I did another time.  I'll try and post the campfire singing next. I've seen many variations of wagon wheel singing over the years that others have shared. The two main sites I've gleaned from are here and here. This is my compilation of those great ideas along with some changes here-and-there.


HOW TO MAKE THE WAGON WHEEL
  • On a poster board, find the center by drawing a light line down the center from top to bottom and and another line from side to side. Then draw 2 more lines in the center between the 2 lines you previously drew to give you 8 pie shapes.
  • Make a handmade compass of string tied with a pencil on both ends (the length of the string between both pencils should be just slightly less than half of the smallest width of your poster). Place one pencil on your center mark and pulling the other pencil with the string taut, draw a circle around the poster.
  • Untie one of the pencils and then retie it back on about 1 1/2" shorter and redraw another circle for the inside of the wagon wheel rim.
  • For the axel circles, just use a small bowl, a glass or some other circular objects to help draw them or reduce the string length on your hand made compass to make the circles. I think I just eyeballed the inside of the axle circle. The axel is about 3 3/4" and the inside circle is about 5/8" in from the outer circle.
  • The spokes are about 1" wide. I just drew a line 1/2" on either side of each of the pie shaped lines then erased the middle line.
  • I colored mine in with chalk since I like how I can fill it in fairly quickly and blend it. I also like how I can erase any boo-boos if I happen to go over the lines. You can use crayons or markers or whatever takes you to your happy place when you color. If you use chalk, make sure you spray it with a FixIt spray to set the chalk so it won't rub off after you do the next step with the Sharpie pen.
  • With a brown Sharpie pen, outline your wagon wheel and draw in some squiggly lines for the wood grain.
  • Mounting the wagon wheel to the spinner (optional):
    • See the 2nd paragraph under the "OH NO!" in the previous post on making the spinner for the placement of the hook side of the Velcro. 
    • Cut four square pieces of the loop side of Velcro. Leaving the protective liner on the adhesive side of the Velcro loop pieces, connect the loop side to their counter hook parts on the spinner placing one at the top, one at the bottom and one on each side of the spinner.
    • Remove the protective liner from only one of the Velcro loop squares and carefully place your wagon wheel poster centered on the spinner and press to adhere the Velcro to the wagon wheel poster lining up the spokes with the nails. Repeat removing one of the protective adhesive liners at a time. This will help to only have to fix one section if you place your poster crooked instead of all four pieces of Velcro. 
  • Print, cut and laminate the pioneer pictures from the file below. There are 10 pictures but only 8 spots on the wheel which is usually enough to fill the time. The extra pics are just some added options to pick from or if you need a couple of more songs to sing. There are also two versions of a campfire. I couldn't decide at the time I made this which one I liked best so I kept both since I had an empty space to fill anyway. Pick the one you like.
  • Place a square piece of Velcro hook side to the center between each spoke on the wheel poster.
  • Place a square piece of Velcro loop side to the backside of each of the pioneer pictures.
  • Place the pioneer pictures on the wagon wheel spinner and you are ready to go.
HOW TO PLAY
  • Select 8 pioneer pictures and mount on the wheel.
  • Have the child spin the wagon wheel (or pick a picture if you are not using a spinner) and whatever it lands on or is picked, remove the picture, share the Fun Fact and sing the song according to the picture. 
  • Whenever a child spins the wheel and it lands on a blank space where a picture has been removed, let another child take a turn to see if they can spin and land on a picture. This allows for more spins on the wheel. If time is short and it lands on a blank, just do the next closest picture.
  • I've attached a key sheet file. The first half is an example key sheet of what I plan on doing and the second half is a blank version to add your songs you would like to do. There are the 10 options to choose from on the key sheet but you will only need to select 8, because like I said, you'll probably be lucky if you even get all 8 on the wheel done in your 20 minute time especially if you end up singing some of them twice like I tend to do on newer ones or the more unfamiliar ones that they may stumble—mumble through the first time singing it.
HERE ARE A COUPLE OF OTHER IDEAS IF YOU DON'T USE THE SPINNER

  • Have the pictures placed around the room for the children to select from.
  • Use objects like toys and stuffed animals to represent the items and place in a box or basket for the children to select from.
Pioneer Wagon Wheel Ways to Sing Key Sheet-Nalani