New and refurbished ideas for LDS Primary Music Leaders (a.k.a. Primary Choristers)
Showing posts with label Song Review. Show all posts

Friday, July 6, 2012

DIRECTIONAL SINGING BIRDS

I like to use different aids to help direct the children in WHO will be singing and/or HOW we will be singing. I call these my Directional Singing Aids. Of course, with birds known for their singing and my last name being BIRD, I would be amiss if I didn't have some directional singing aid that wasn't bird related. So, one such aid I have created is my Directional Singing Birds. I have different bird signs that either show WHO can sing as well as HOW we should "sing".  


These are fun & easy to use whenever you need to help teach the melody of the song or sing a song over and over and over again. I've made two sizes that I use in different ways and have included the files below, but the smaller size might just be fine if you have a smaller Primary and only want to do one size.


The full, paper-sized sheets are laminated and then each mounted on a paint stirring stick. You could mount each individually on a stick or if you want, do two per stick, back-to-back keeping the "Who" birds grouped together and the "How" birds grouped together. That is what I did, but with the "Sing" and the "Hum" on their own sticks since I didn't have another one to group with each of those and besides, if I come up with another "Who" or "How" bird, I can add it to the back of those; but you could even put the hum and sing together on one stick. You may want to separate the girls and boys signs in case you want to hold up both for both to sing or you could just hold up the sing for both boys and girls. Instead of laminating, you could just put them in sheet protectors and hold them up. You only need to print one set of these larger birds

I will switch between two or more birds while we sing only using the WHO and other times only using the HOW. But then sometimes I may hold up a WHO and a HOW at the same time and switch them out while they are singing to make it a little trickier. This is a little easier to do if you only use one in each hand. It can be a little more trickier if you try to switch between several. To use more birds, an easier way is with the smaller size and posting them on the board as I'll explain below.

For the smaller size (2-per page file), print one or two sets of the birds except the Sing Bird. Print several of the Sing Birds so you have more opportunities to sing all together and maybe even a couple of extra of the "girls" and "boys" cards.  Cut around each leaving about a 1/4" border, laminate them and then adhere magnetic tape on the back side at the top and bottom. 

To use, post the flip chart to the song you will be teaching/reviewing (I use my magnetic page protectors on the board. See here for the post on how I make my magnetic page protectors for flip charts.) Have some children each pick a bird card that you have face down and fanned out like cards in your hands or in a stack on the table or displayed on the chalkboard rail. Then have each child place the one they picked under one of the flip chart pages and then sing the phrase, phrases, verse or the whole song in the order of the "Birds." After singing it through, continue to repeat the process until the time is up for that activity. 
Example of using just "WHO" sings birds
Example of using a mix of "WHO" & "HOW" birds.
You could also remove all the "Sing" birds from the draw pile keeping them separate and then only have a few children, depending on how many flip chart pages you have up, each pick a card and put up on the board under any flip chart page and then you fill in the rest with the "Sing" bird cards.

Another way to use these are like flash cards. Hold the "shuffled" stack in your hands face out to the children with the "Sing" card first, start singing and as you sing the song, every now and then, move the front card to the back and the next card up is who or how they will continue to sing the song. This keeps it fun and they have to concentrate a little since they don't know what will come up next and if they are "Ahhhhhing" and then a "Sing" card comes up, they will need to pick up singing the words from that point on. 

I will be using some of the birds in helping the children learn the new melody I will be teaching for the song
"The Wise Man and the Foolish Man". 
I will be posting my ideas for that song next if you are interested.


Have fun singing like birds!!!


Bird Directional Singing Signs-Large-Nalani
Bird Directional Singing Signs-2-Per Pg-Nalani

Saturday, June 23, 2012

TIC-TAC-SING REVIEW

I'M BAAAAAAAACK!
WHEW! It has been a busy summer already with a new grandchild being born, hanging out at amusement parks with the grand kids, camping with the fam and a zillion other things on top of the every day stuff. 


Since this is the last Sunday of the month, it is time to do a review of the
program songs.
Sometimes, these review times are the only chances we get to sing some of them with so many other songs to sing throughout the year. This Sunday, I am going to do a
Tic-Tac-Sing. 
This is an easy and fun review game to play. I have an old Tic-Tac-Toe poster board game board I'm going to use that I made a zillion years ago before we had a chalkboard in the old building's Primary room—back when the room was originally designed as the "JR Sunday School Room" AND before they had the portable rolling chalkboards in the building AND shortly after they changed to the block time and moved Primary from the week day to Sunday AND when computers filled rooms instead of compactly on top of a desk, so yeah, we used easels and posters a lot back then. WOW! I'm really dating myself aren't I?! The lamination has actually held up well on this poster over the years compared to other posters I made back then. I just cut strips and letters out of red poster board and glued them to a yellow poster board. I did revamp my "X" and "O" markers using my Cricut machine a year or two ago. I've attached a scanned image of the "X" & "O" markers, so if you want to make a poster, you can print at least 5 sets of these markers out on card stock paper, cut them out and laminate them without having to go through the work of making them from scratch. I did add Velcro on the back side of the markers as well as on the game board so they can easily be placed or removed with each game played, but you can use good ol' masking tape like I did back in the day. If you don't want to make a game board, just use chalk and eraser.
Easy and Quick!
To play this game, I am actually going to have them sing one of the verses of the song first before asking and having them answer the question. Since we haven't sung some of these for a while, this will help them review it, hopefully they will concentrate on the song so it will reinforce it in their mind as well as help them so they can answer the question correctly. I will be reviewing the songs/verses in the order I have on the Q&A sheet.


Here are the general game rules to play. I've attached the file and questions below if you want to print them out. I have more questions than can be done in the 20 minute allotment, because I will have the full Singing and Sharing Time this week, so adjust to fit your Primary and time slot. 


HOW TO PLAY


JR: NO TEAMS
  •  Sing the song or verse to review before each question.
    •  Split the songs into verses so you can focus on each section at a time and to give more opportunities for questions.
    • Singing first will help to review the song while giving the children the opportunity to concentrate on what they are singing and to also motivate the children in singing in the hope to be chosen to have a turn to come up.
  •  Ask the question for the song/verse just sung.
  •  The child that answers the question correctly gets to come and put up a game marker.
    •  Rotate selecting a child from each class to have a turn to answer.
  •  Alternate the “X” and “O” markers with each question. 
  • Warn the children, if necessary, that if they do not participate or are not reverent, you will remove one of the game markers (start with the center one since that is the most strategic spot.)
  •  Continue singing and playing until there are three in a row.
  •  Start a new game if time permits.
JR optional ways to play with teams

Primary vs Music Leader (you)
  •  Play the game similar to the rules above; however, the Primary will be “X” and you will be “O”.
  •  If a child answers correctly, they put up their marker. If they give a wrong answer, you get to put up your marker.
  •  You do not answer any questions; just the children.
 Teachers vs Children
  •  See the SR “How to Play” rules.
SR: TEAMS
  • Divide Primary into 2 groups.
  •  Sing the song or verse to review before each question.
    •  Split the songs into verses so you can focus on each section at a time and to give more opportunities for questions.
    •  Singing first will help to review the song while giving the children the opportunity to concentrate on what they are singing and to also motivate the children in singing in the hope to be chosen to have a turn to come up.
    •  Let the teachers and children know that their teacher will be watching to see who is participating and paying attention and will be picking who gets to come up and play for their team.  If you are playing teachers against the kids, have a presidency leader help look for the children who are participating or you can just pick.
  •  After singing, select a class on each team and have the teachers select a child from their class to come up to be the game contestants to answer the questions. You should have 2 contestants.
  •  Ask the question to the song/verse just sung.
  •  The first contestant to ring the bell or buzzer and answer the question correctly gets to put up their team’s game marker on the Tic-Tac-Sing board.
    • The contestant has 5 seconds to answer the question correctly. If he/she cannot answer correctly within the 5 seconds, the other contestant gets a chance to answer correctly and put their game marker up on the board.
    •  If neither team answers correctly, no “X” or “O” gets on the board at this time. Just have any child answer the question 
    • OR
    •  Sing the song/verse again and then pick someone from the team that was singing the best to answer the question. If he/she answers correctly, that team gets to put up their game token on the board.
  •  Repeat playing the game until one team has three markers in a row.
  •  Start a new game if time permits.
  •  To help keep some semblance of reverence, let the children know that if at any time their team doesn’t sing or gets noisy; they will have one of their markers taken off of the board.
TYPES OF TEAMS FOR SR PRIMARY
  • Split the room in half
  •  Girls vs Boys
  • Children vs Teachers
GAME VARIATIONS
  • Play a life-size version by using painters tape to make a grid on the floor or use small chairs and have the child that answers correctly stand or sit in the spot. You may want to have the child hold an "X" or "O" to help visually.
  • Play the game to just review one song over and over again as you practice each phrase of the song.
  • In reviewing one song, you could take turns for each team to sing the song and if they sing it well, they get to place a marker.
  • Do a combo version with "Name that Tune". Have the pianist play a few notes and the contestant that names the song correctly gets to place their marker then sing the song.


Tic Tac Sing Program Song Review Nalani


Tic-Tac-Sing X-O-Nalani

Saturday, May 19, 2012

MUSICAL BATTLESHIP—SONG(S) REVIEW GAME

Using the classic game of BATTLESHIP to help review a song or songs was an idea I originally saw on Divine Secrets' blog back in 2009 and I thought it would be something fun to do sometime, so I put it down on my "Someday To Do Idea List" and there it sat just patiently waiting for me. Now with the advent of the movie BATTLESHIP coming out this weekend, I thought it would be a fun time to pull it out. No, I haven't seen the movie nor have I heard anything about it or even seen any previews, but, maybe the older kids have and might find this fun and exciting. And hey, a good ol' classic game, I don't think you can go too wrong with that. So here is my take on the game.
I created a gamboard grid and markers that you can print out if you like, but you could also play it the way it was originally done with pencil and paper, well, chalk and chalkboard for the Primary room. Just draw a grid on the chalkboard with the alpha-numeric headers and draw in X's and O's or other shapes for the hits and misses as you play. Basically, you play it like the classic game of BATTLESHIP with just a few fun musical changes.


HOW TO MAKE
  1. Print out the game board on card stock. I specifically made each section on its own sheet instead of it all being on one sheet that you print out into a poster format because I wanted to make sure the squares would be the correct size to fit the markers. If I had you print it in a poster format, than the squares would vary in size depending on what size each of you printed it since each printer can vary a little on the percentage from its original size even if I gave you an exact percentage to print out. Yeah, I know . . .blah, blah, blah.
  2. Print on card stock one page each for all the markers that you want to use. Remember there are enough colors for up to five music ships. You will need to print multiple pages for the Treble Clef and Coda markers.
    1. There are a total of 35 squares that you will need markers for.
  3. For the game board, cut off all four sides of each page just along the inside of the dotted lines and for the solid lines, cut lengthwise down the middle of the solid lines, that way when you butt the pages up together, you won't have thick lines since you will be leaving a half a line for each page except the top "A" row, cut that top row of solid lines along the out side edge so you have a full, thick line. Sheesh, hope that all makes sense.
  4. You can tape them together in the correct order by butting them up or mount them to a poster board. You can size the game board to fit a poster board if you cut off the bottom set of numbers. 
    1. You can laminate your poster if you prefer. I am mounting mine to this thick poster board I get from work that comes with this plating material we purchase that just gets thrown away (it is like several poster boards thick and just a little larger in size). I love it because it is sturdy and free. So, I won't be laminating mine and besides, I have found over the years that poster board does not hold up well with lamination. Some posters I've laminated in the past have begun separating so now they are looking like a poster board in a baggie. I've been told by my copy center that lamination sticks mainly to itself and over time it will separate from the paper surface of thicker and larger pieces.
  5. Cut out the markers along the outside of the solid lines or insides; your preference. Laminate these if you prefer. I will because that will help them hold up better.
  6. Mount a square piece of self-adhesive Velcro (hook and loop tape) to the center of each square on the game board. Mount the opposing square piece of Velcro to the markers. This makes the game reusable. 
MARKERS (Musical Symbols—see the first picture)
  • Miss: Treble Clef 
    • For the blank spots—do nothing
  • Music Ships: Connected Eighth Notes—3 of the same color per ship
    • There are enough sets of colors to do up to 5 Music Ships if you do 3 per ship.
      • You may want to only assign one or two markers per song instead of three depending on how much practice you want to do for each song.
      • If you want to use this as a songs review instead of just concentrating on one or two songs, just assign a different song to each ship.
    • The markers represent the song(s) you are reviewing
    • Assign a verse or song you are working on to each ship and you will sing it each time they hit that color
    • I am not planning on assigning a specific verse to each ship color. Because I want to be more orderly in singing this song through, the first ship they hit will be verse 1, when they sink that ship and we hit the next ship, we will sing verse 2. My 3rd ship will be verse 3 of "If the Savior Stood Beside Me" that we haven't had much time to work on.
  • Submarines: Single Eighth Notes OPTIONAL
    • Fun, wiggle, program or other songs
  • Sea Mines: Coda OPTIONAL
    • Song questions: make a list of questions about the song or songs—one question for each Sea Mine used in the game

HOW TO PLAY (see update below)
  • Post the blank game board and have a child call out a coordinate (one letter and one number) e.g. A-2 
    • For JR you may just want them to quickly come up and point to a blank square.
  • Using your key sheet, determine if it is a miss, hit, submarine or sea mine.
    • If it is a miss, place the Treble Clef marker in the square and have another child select another space. You could have the JR child put the marker up.
    • If they hit a Music Ship, sing the verse of the song or song for that music ship. If they sing it well, place that ships color marker on the game board and have another child select a coordinate.
      • Each time they hit the same part of the music ship, you sing that verse or song over again. I plan on using my visual for "When I Am Baptized" and after the first time through, removing two of the visuals for that verse and one visual from the chorus off of the board so by the time they hit the ship the 3rd time they will need to sing the song without the words for the 1st verse and they must sing it well in order to sink that music ship.
      • Add more Music Ships for more songs if you use this on a Sunday you have the full Singing and Sharing Time allotment. 
    • Optional Way To Play: If you want to do a combined Singing and Sharing Time or if you happen to be the music leader and a Primary President or counselor that is doing a double duty calling (usually in smaller wards/branches), this game is a good one to use as a combo Singing and Sharing Time. In between sinking the Musical Ships, use the Sea Mines for questions and/or discussion moments for that week's topic or about the song.
    • Optional: If they hit a submarine, you can have them sing another song like a wiggle song, another program song, or whatever song you want them to sing, hey, you are the captain admiral. This will give a little variety.
    • Optional: If they hit a sea mine, they must answer a question about the song. I plan on using a few questions just to help fill up some blank spaces and to review/test their understanding of the song and melody. Use this if you want to have less blank spaces or if you will have a longer singing time.
  • I will have my little over-bedazzled treasure box, I made a couple of years ago and have used for a variety of things on several occasions, to hold some baptism stickers to give out at the end of singing time after we sink all the Musical Battleships. I'm hoping that might be incentive for those older boys who may just try and not pick the Musical Battleships after they make one hit on it. Always trying to stay one step ahead of those rascals.
This should be a fun way to review a song or several songs over-and-over again.
Here are a couple of pictures of the key sheets showing three music ships and three submarines. Add Sea Mines (Coda Symbol) if you want.
Key Sheet 1

Key Sheet 2
The file for the game is below and includes the game board, game markers, blank key sheets and 2 sample key sheets.


Bombs Away On Your Singing Time!


UPDATE!
As much as I plan what I am going to do for singing time, something I have learned as a Primary Music Leader is that things don't always never go the way you plan. Depending on how much time you have or what is going on in your Primary that day, you become good at adjusting and adapting during your singing time. Because of a little shorter time and wanting to keep the game moving more, I made some changes to the game on the fly that also helped in adapting to how the children liked to pick the coordinates. They seemed to like to pick randomly on the board instead of trying to find the three in a row. So here is an adaptation idea to play this game that is more freeform that will help keep things going. Instead of having the three ships in a row, I randomly had the ships individually scattered on the key sheet along with the sea mines and subs. Each time they found a ship, any colored ship, we sang the first verse and continued to sing it each time a ship was hit until the first three ships were found. After singing it three times, that part of the song was sunk (still removed some visuals the 2nd time through and then no visuals on the 3rd time as in the instructions above). For SR I only did two ships for the first verse since they didn't need much practice on that verse. The next three ships found would be for the next verse and so on. Same rules as above, just random placements of individual ships. I'll admit to tweaking the game a little during play if after a few misses were found in a row, I would have the next guess end up being a ship even if it wasn't where one was planned on the key sheet. So in actuality, I had my key sheet handy and used it as a general guideline, but adjusted where the ships, subs or sea mines were a couple of times to make sure we kept singing without too much down time. Hope that all makes sense. You could really just pretend to use a key sheet and just randomly let them hit a ship, sea mine or sub. Yeah, that is rigging the game, but hey, you gotta do what you gotta do in the short time you have. The main object is to just have some interesting fun while the children learn the songs.  


Musical Battleship—Nalani

Wednesday, May 9, 2012

MOTHER'S DAY: LOVING HANDS

These are the beautiful loving hands
of my daughter-in-law
A couple of month's ago I took pictures of something I was holding in my hands. My first impression upon looking at the pictures was, 
"Ooooooooo, my hands are so old and worn looking." After staring at the picture for a bit, I noticed the scar on my hand from when I was crossing a busy street one day when the baby in my womb moved in such a way to pinch a nerve that caused me to loose all feeling in my left leg, which resulted with me falling to the ground in the middle of the crosswalk. The scar reminded me of my attempt at protecting the child of mine from the fall and despite the blood and pain from my arm and hand at the time, I was exhilarated from the life I felt that let me know that this baby was still alive. Having lost several babies before around the 6th & 7th month of pregnancy, every movement I felt was a JOY no matter how much pain or discomfort it caused. As I continued to look at my hands, I began to also SEE the things I cleaned around the house, the foods I cooked, the dishes I washed, the clothes I ironed, the dresses and costumes I sewed, the weeds I pulled in my garden, the places I drove to take my children, the diapers I changed, the school projects I helped put together, the pages I turned during bedtime stories, the massages I gave to tired and aching muscles, the hugs I gave to give comfort and love, the hands I held in moments of fear, the tears I wiped in times of sadness and joy, the kleenex I held to wipe runny noses, the babies I held to rock gently to sleep, the many letters I wrote to my sons serving missions. . . oh, the list goes on-and-on and let's not forget the children who are led in song in Primary each weekLooking at my hands I saw a lifetime of hard work and love given to others. So yes, every scar, wrinkle, freckle, age spot, puffy vein, cracked and pudgy part have all been well earned and told the story of my life and the loving things I did. That is what got me thinking about the loving hands of those who love and take care of us.


So in-light of that, this is what rattled around in my head back then to do when Mother's Day came up. As a side note, using the gloves and dynamics part to sing can also be used any time you want to review a song or do a choose and review activity.  
  • Take pictures of the loving hands of all the Primary children's mothers or where applicable, those who help take care and raise them, because these days, not all children live with a mother. Sometimes it is their grandma, their dad, an older sibling, an aunt, a foster mother, so take a picture of their loving hands if the mother is not available.
    • It has taken a few hours to get pictures of loving hands for every child (I'm still trying to get the last few), so a quicker solution is to only take pictures of a select few, especially if you have a large Primary.
    • I'm probably going to print out the pictures of the hands and group several together to post on the board at a time, but another option might be is to show them on a laptop or iPad, but that might be more cumbersome to flip back-and-forth with if you have a lot of pictures.
  • Before I begin I will have the children take a look at their hands and ask them to think of kind things they have done with their hands this past week and maybe have a few children share. I'll also make a quick mention along the lines that our hands are capable of doing many kind and good things and when we do kind and good things, our hands become loving hands. I'll then segue into how we also have people in our lives who help us with their loving hands.
  • Post on the board or hold up a few pictures of loving hands and have the children see if they can recognize any of the loving hands. I am a little nervous on how much time this might take, so be careful and only give them a little time to guess before giving them the answers. Depending on how many pictures you have you could print one or two sets of hands per page. I wouldn't go smaller since it might be difficult for the children to see the pictures.
  • Have a selection of gloves displayed in a basket or laid out on a table. I will use my singing apron with big pockets to put the gloves in. The children will choose a pair of gloves that will determine the song to be sung and how the song will be led with loving hands. I may have a child help lead with the gloves, but I am leaning this time towards leading myself to help save on time and because that will also give me more control on leading the songs with the various dynamics since sometimes kids can get a little silly. I'll give a list of possible gloves that you can use and some dynamics for how to sing below.
  • If you don't want to use gloves, you could just assign a song to the picture or group of pictures or maybe you just want to use the gloves and not worry about the pictures of the hands.
  • After singing a song, repeat taking a moment to guess a few more loving hands pictures before going to the next song.
  • Here are a few options for types of songs to sing:
    • Mother's Day songs
    • Program songs
    • The mother's favorite Primary song. If you are choosing songs by picture instead of gloves and have a lot of pictures you are grouping together, you could ask the mothers for a few of their favorite Primary songs instead of just their favorite and then group the pictures together of those that have a similar favorite song. So far in the list I've gathered of the favorite songs from mothers and grandmothers there are many common ones between the mothers which helps make it easier to group together since I am trying to get pictures of all the loving hands.
    • Have a mix of Mother's Day songs, program songs and some of the favorites off of the mother's favorites list you've made. I'm going with this option using the gloves.
  • Gloves—Here is a list of possible gloves you might have around the house to use for the children to select from. Assign songs and a way to sing the song to the gloves. If you want to just review a song over and over again, just assign a way to sing to each pair of gloves you use:
    • Evening or Dress Gloves (I love the elbow length gloves)
    • Gardening Gloves
    • Work Gloves
    • Cleaning Gloves
    • Oven Mitt
    • Winter Gloves
    • Surgical Gloves
    • Driving Gloves
    • Leather Gloves
    • Exercise Gloves (biking, weight-lifting, etc.)
    • Baseball Glove
    • Car Washing Mitt
    • Ski Gloves
    • Scuba Diving Gloves
    • Boxing Gloves (yes, mothers do fight for us in so many ways)
    • Maybe you can think of other gloves to help demonstrate the many things loving hands do. If you do, please leave a comment to share.
  • Dynamic Ways to Sing—assign to songs/gloves and lead the children switching between the dynamics. These are great ways to practice with the children on following you and familiarizing themselves with the different ways to sing in relation to how you will lead them. I do exaggerate a little on the leading to help them differentiate between the two I'm switching between and it also helps to keep their eyes on me. The kids seem to really pay attention to my hands when I put on gloves. I guess it gives them a focal point or maybe it is just my exaggerated "maestro" conducting. I've listed the musical terms and their definition. The list below is pretty self-explanatory on how you would lead them, but I'll give an explanation on a few that may not seem as clear.
    • Forte (strong and loud) & Piano (gently & softly)
    • Allegro (cheerful & fast) & Largo (slowly)
    • Staccato (short) & Legato (flowing & smoothly)
    • A Capella (without accompaniment) & Con Musica (with Accompaniment)
      • I will hold out my right hand in a stop mode toward the pianist to stop playing while I continue leading with my other hand then I lead with both hands for the pianist to play or you could lead up high for A Capella and down low for with the piano if leading with your non-dominate hand is more difficult.
    • Crescendo (growing in sound) & Diminuendo (diminishing in sound)
    • Ragazze (e is pronounced like an a) (girls) & Ragazzi (i is pronounced as an e) (boys)
      • Lead right-handed for boys and left-handed for girls and both handed for both to sing or up high, down low and in the middle
    • Fermata (every now and then, have them hold the note)
    • Vibrato (vibrating/pulsating change of pitch—like opera—you could have the children wiggle their finger on their throat) & Straight Tone (normal voice)
      • Use your finger on the throat for vibrato and off the throat for normal singing
Happy Mother's Day to all you fantastic women out there that give so much with your loving hands!!!

Wednesday, April 25, 2012

DON'T FORGET THE LYRICS SONG(S) REVIEW

So several months ago some of my employees were enlightening me about the many singing, musical, dancing reality game shows out there (or whatever they are called). Although, I had heard of several of them, I did feel a bit clueless about them since I'm never home to watch them and if I were, I still wouldn't have time to watch them. I know, I'm probably in the minority group that is out of touch with these popular shows. But, HOLD ON! I'm not totally oblivious. I'll confess that I did get hooked on Dancing With the Stars a few years ago when my hubby told me that my one and only teenage heart throb, Donny Osmond, was going to be on the show. Of course I had to watch and only for him did I shorten my long work days in order to make it home from work in time to watch. Ahhhh, and he was so AWESOME! And of course, he won! Was there ever any question about that? I think not! Okay, so now I totally went off topic and I also let a little of my secret, youthful side of me slip out for all to see, but hey, I may be past the half century mark compared to many of you, but I am still very young at heart! Or at least I like to think I am. Now, if only I could get my body to realize how young it should feel.  SIGH!!!

Okay, back on topic. So, one of the games that was mentioned that I had never heard before was
DON'T FORGET THE LYRICS!
The gist of the game is for the contestant to sing songs karaoke style reading the words off of a screen and at some point in the song, blank spaces appear replacing some of the words in the song and the contestant must fill in those blanks by continuing to sing what they think are the correct words. The contestant is given a chance to "lock in the lyrics" or the contestant can change any words before he or she decides to "lock in the lyrics" after which, the correct lyrics are revealed. If the contestant is correct, he or she gets to move to the next round. The contestant also gets a few "backups" to choose from if he or she needs help. If you want to know what the show is like, you can do a search on YouTube for Don't Forget the Lyrics to watch.


Well, of course, after learning about this game, this sounded like a singing review game in the making for my Primary and the GEARS started turning...And this is what I came up with. It is fairly easy to put together and do.


NOTE: I did this for a whole Singing and Sharing Time (35 minutes), so probably reduce by about half for the regular 20 minute Singing Time. Since this had to do with reading, I only played it with my SR Primary and they loved it. They sang really well and knew the songs better than I thought, especially since we hadn't sung them for about three weeks. I only did three to five blank words and that was too easy, so next time, I'll have to make it harder with more blank lines. If you want to play it with the JR Primary, you can do it by maybe having the pianist stop playing when you get to the blanks. You will have to make a key sheet for your pianist of the word to stop on for each song/verse before the blanks or just before you begin singing, tell the pianist the last word to stop on. 


PREP
  • To keep it simple, I used all my flip charts in page protectors in a binder as my "karaoke screen" and printed sheets of papers with blank lines on them to represent the missing words. File is at the end of the post.
    • Select which FC page(s) to cover up for each song/verse. Count the words on the page(s) and insert a corresponding blank lines sheet inside the page protector covering up that page of the flip chart. I also stuck a dark green colored paper between the flip chart and the blank line sheet so you couldn't see the words behind the blank lined paper. I just used dark green since green is the color used in the game to show the corrrect words, but you can use any dark color, just make sure you can't see the words. Make the game harder by covering up two pages of words.
    • I've included a file of blank lined pages starting with three blank lines up to eight blank lines. I think that would cover about any combination you might come up with. Just print out the combinations of pages you need for the FC pages you plan to cover up or you could just make your own by taking a marker and making some lines on the paper to represent the blank words.
    • If you don't have or use flip charts, you could just type up the words to each song and insert blank lines for the words you want to omit. You actually don't need to type up the words. You could copy and past them from the LDS site that I have a quick link to above: 
      • Click on the "Resources" page tab above and then click on the "Children's Songbook: Text Only" link. Look up the song you want and copy and paste the words into your document.
  • I split the songs up by verses using a verse for each round. I mainly focused on the assigned program songs as well as a couple of others that will be in our program that I have been teaching in Primary. 
  • You can play this game to review just one song over and over by switching out on the different phrases or for reviewing several songs.  
  • On the chalkboard to one side, write in a column starting with the lowest points at the bottom working to the top to the highest points (use less for the 20 minute time frame): 
    • 100,000
    • 50,000
    • 25,000
    • 10,000
    • 5,000
    • 2,500
    • 1,000
    • 500
    • 250
  • Ask a teacher to come up and be your "Vanna" helper to write the words on the board as the children sing them and to help keep score.
  • Use some bright colored chalk to make it more visually fun.
HOW TO PLAY
  • Although we did play this game as one whole Primary team, I did have "class contestants" whereby each class took turns as a class singing the missing words part to keep it exciting and challenging.
  • Hold up the flip chart and have the whole Primary start to sing the song. When you get to the page(s) with the blanks, everyone stops singing except the assigned "contestant class" who continues to sing to fill in the blanks. You could have individual children take turns standing and singing, but I liked the idea of having them all sing together to get in more practice for everyone.
  • Stop singing at the end of the blanks. You do not finish singing the song at this point. 
  • The teacher helper than writes the words on the chalkboard that the "contestant class" sang. The teacher will need to pay attention for when everyone stops singing and the "contestant class" continues singing the blank words part. Since you will know when the blanks come up, you will probably need to help the teacher by telling him or her which words the kids sang so that the teacher can write them on the board.
  • Ask the "contestant class" if they want to "Lock in the lyrics" or do they want to change the lyrics? They do get the opportunity to do that. Have the teacher make any changes on the chalkboard that the children want.
  • When the children think they have it correct, ask them again if they want to "Lock in the lyrics?" Make sure you keep this process moving. Don't let the kids drag out their thinking time.
  • After the lyrics are "locked in" pull out the blank lined paper and the darker paper to reveal the correct words.
  • If their answer is correct, have the teacher circle the first round points on the chalkboard. Use a different colored chalk than what the numbers were written in to help it stand out.
  • Have everyone re-sing the song or verse together ALL the way through this time without any FC. I told them if they weren't able to sing the verse all the way through fairly well or with good effort, they would loose their points they just earned. Thought that would give them a little more incentive, but they were into the game and sang well anyway. This also gave me the opportunity to see what parts of the song they were weak in.
  • Go to the next round by repeating the process with the next song or verse and with the next class being the "contestant class" and singing the blank words.
  • This gives the opportunity to sing most of the verse with help (like a warm up—refresher) and then they sing again without any help (so you know if they know the song.)
  • You probably will have to explain at the beginning what the word "lyrics" means, but ask them first in case one of them knows.
  • Although I think it would be fun to have categories for the children to pick from, like in the actual game, I chose not to go that route to mainly save on time. Sometimes kids can take a long time to pick something. I just had my flip charts in the order I wanted to go through for each round, starting with the first song and first verse for round one, then the second verse for round two, third verse for round three, second song—verse one for round four, etc.
BACKUPS (optional)
  • If you want to add a little extra to the game, you can add the "Backups" option, but you do have to have it challenging for them by having several words blanked out in order to increase the odds of them getting stuck and needing to use a back ups. Only one back up may be used per "contestant class" and once used, no one else can use it. I've included a file below of the "Backups".
  • You can either have the class choose which backup they want to use or assign the backups to specific song(s).
  • The back ups are: 
    • Backup Singers—Teacher's Help: They may select any teacher to help them with the missing lyrics.
    • Backup singers—Class Help: They may select another class to help them with the missing lyrics.
    • 2 Words: They may select two words from their answer to find out if they are correct or not. For example, if they want to know if the 3rd and 5th words are correct, you tell them if it is correct. If one or both of the words are incorrect, tell them what the correct words are and have the teacher helper replace the wrong word(s) on the chalkboard.
    • 3 Lines: You will give them three possible answers that they can select what they think is the correct line to the song. You will need to prepare answers for each song round unless you only assign this to certain songs or maybe you are a quick thinker and can come up with something on the spot. Here is an example:
      • As a Child of God verse 3: In my own home I'll happily serve.
        • I'll strengthen my muscles by lifting strong weights.
        • I'll strengthen my family by doing good things.
        • I'll strengthen my family by my good works. 
      • I usually did a silly one, one that was pretty close to the correct answer and of course, the correct one.
Well, that is the game. It is really rather simple to do despite the loooong explanation. We had fun with it and it was a good team and class effort. Only one class missed a round. The funny part was that I kept asking that class if they wanted to use one of the backups and their teachers were pretty adamant  about locking in their answer because they were soooooo sure they were right even when a couple of the kids in their class wanted to use a backup because they didn't feel confident about their answer. We had a good laugh when the teachers were a little humbled. I couldn't help but make the comment, of course in good jest, that maybe the kids might want to think twice about selecting the "Teacher's Help Backup" if they get stuck???? LOL

I had a little more time at the end and since they were just one round short of winning, because of the one class that lost their round, I gave them the opportunity to sing all three verses of "Choose the Right" without any visuals and mostly on their own to win the final round (I did step in and sing the few parts I knew they kept mixing a couple of the words up on.)


Have some fun singing and DON'T FORGET THE LYRICS!

FILE


Thursday, March 29, 2012

iPOD SINGING

I have soooooooo been wanting to do this iPod singing time for quite some time.  I actually had this almost all put together last September with the intent to use it for a program review activity, but then our program date got moved up a couple of weeks, so unfortunately, I had to drop it from my plans. But NOW, I think we have a few songs under our belt, that I can finally do it to review program songs and other songs we have been learning lately. 
So, what is this iPod Singing I'm talking about???? Well, you may already know it by the name of "Remote Control Singing". This is a fun way to review a song over-and-over again or you can use it for a choose and review activity.

When I happened upon the idea of a remote control singing time, you know, I couldn't quite wrap my head around what a t.v. remote control had to do with singing time, so I couldn't bring myself to doing it, but I liked the concept, so, think...think...think...I did. Hmmm, what do I listen and sing to every day getting ready for work, driving to work, at work in my office, walking around my workplace (oh yes, ask any of my employees and they will tell you I am singing all over the place—the one good thing about being the boss is, they wouldn't dare complain about my singing—at least to my face, LOL), coming home from work, and every-other-moment I can squeeze in to learn those primary songs????
Voilà! My iPod on my iPhone!  So, here is my version for an iPod for singing time. 

I really wanted this visual to be interactive instead of just pretending to push a button. Just thought I'd let you know that up front so as you are reading through this post, you might understand the reasoning behind my madness for making it the way I did.  Since I've already created the buttons, it is pretty easy to put together. The files I made are listed at the end of this post.

HOW TO MAKE THE iPOD
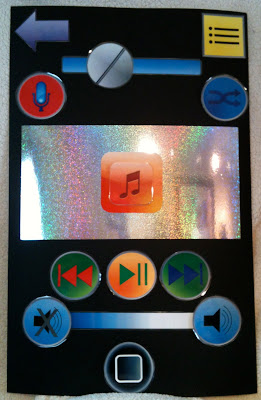
  1. The iPod I made is a bit large.  It is 28" wide by 44" high. I had a big black mat board, but you can use cardboard and paint it whatever color your heart desires. 
  2. I created two sets of the icon buttons. One set is slightly smaller than the other. (File with both sizes below under "Large iPod icons buttons")
  3. I printed the buttons out onto card stock and cut them out.
  4. I ONLY laminated the larger sized buttons for durability.
  5. The slightly smaller unlaminated set of buttons I mounted on the board with spray adhesive.
  6. I also printed and cut out the slider bars—those are the long bluish, rectangular thingies—and glued them on the board.  IMPORTANT: The slider bars should be glued down first and then you glue the buttons over the ends of them (for the screw head, it can be placed anywhere on its slider.)
    1. I printed my sliders on 11 x 17 sized paper so I could have it all on one piece of paper instead of splicing two together (11 x 17 size in a separate file below.)  However, if you don't have the capability to print that size, I added one you can print on 8 1/2 x 11 and splice together.  Just cut off the ends that you will match up and splice together to the size you need (it is included with the iPod Icon buttons file.)
    2. Ooops!  I goofed!  My top slider is solid in the picture. It should have been the same as the one for the Mute and Volume slider. I had done a couple of variations and cut them out to see which one I liked, but I apparently glued the wrong one down. Oh Well.
  7. I then centered a square piece of self adhesive clear Velcro (also known as hook and loop tape) onto the top of the glued down buttons so the Velcro is less noticeable (this is the hook side of the Velcro).  See the blue volume button in the picture.
  8. Velcro (hook and loop tape)
    The clear hook side on the glued down button
    and the matching white loop on the back of the laminated button. 
  9. I then placed the Velcro's matching loop mate on top of the the hook side with the adhesive side facing up.
  10. Taking the larger matching laminated button, I centered it over it's matching glued down button and then adhered it to the Velcro so you really couldn't see the matching button underneath. I'll explain later the purpose of the duplicate buttons. See the back side of the volume button in the picture. I did it this way so I could make sure the top button would be centered before the velcro got attached.
  11. The big, sparkly rectangle in the middle is some holographic leftover paper I got from work a while back ago that was being thrown out. Yes, since this calling, I've become quite the garbage picker at work. Always looking for free things to use for singing time. The paper was sparkly and fun, so I decided to use it to make the "view screen" panel area, but you can use whatever other paper you have on hand. 
  12. I painted a paint stirring stick black and adhered a square piece of the hook side of the Velcro to it at the top. 
  13. There you have it. A singing time iPod for some good singing review time.
OTHER "HOW TO MAKE" OPTIONS
  1. If you want to make this on a poster board or one of those project boards that are 3-sided and can also be self-standing (aka science fair project boards), I have included a smaller iPod set of icon buttons.  The smaller iPod set fits nicely on the center panel of the project board, which is about 22" wide x 36" high. The buttons would probably be a little crowded on a poster board unless you tape another 8" section or more to a full sheet of poster board to make it taller like the project board size. 
  2. If you want to omit the board altogether, you could just print one set of the buttons, excluding its matching, slightly smaller background version that would have been glued to the board, and using magnets or magnetic tape, adhere them to your chalk or white board inside a rectangle you have drawn on the board with chalk, or a dry erase marker if you are lucky and have a white board.
HOW TO USE
I first showed the kids the iPod on my iPhone asking them if they could see the buttons because we were going to use it today for singing time. Of course, they couldn't and then I said something along the lines of, "What if I SUPER-SIZED  it?  Would they think that would help?" And then I whipped out the super-sized iPod. I'll admit, the kids eyes bulged out a bit when they saw the super-sized iPod.
  • Each button represents a way to sing the song. (How to sing listed below)
  • You can use this to practice singing a song over and over again (repetition) that you are trying to learn, but by singing it in different ways, you have the variety you need to make it more fun and exciting for the children without being boring.
  • You can use this as a choose and review activity by writing a song or one of the verses of a song on the back of each button (use a wet-erase type marker like Vis-à-Vis or a washable marker to write on the lamination) and then singing that song according to the button chosen.
  • This would also be great for a program review singing activity using the songs for the program as a choose and review.
  • Another reason why I glued one set of buttons directly on the board as "fake buttons" is just in case I plan on only wanting to use certain buttons to review certain songs within the allotted singing time. With so many buttons to choose from, if I had a song behind each button to choose from, the children might not pick the songs I would really like them to work on.  This would give me more control of only putting the buttons I want to use on the iPod with the songs I want to sing and keeping the iPod still looking like an iPod with the glued down "fake" buttons. I also didn't like the empty look it would be getting as each button gets removed. 
  • You can use the paint stick to adhere the chosen button to for the child or you to control the singing, for example, if it is the pause button, when the child holds it up, everyone pauses in their singing and when they lower the button, everyone continues singing where they left off.
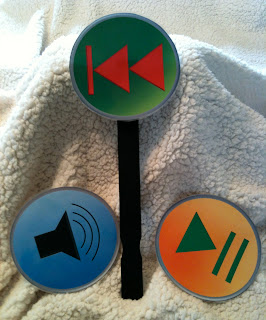
    • If you don't want to use the stick, you could just have the child hold up the button.  The stick is just more fun for the kids to hold and more easily seen, at least I think so.
  • Make sure the child controlling the button stick can be seen by the pianist since some of the activities will need the pianist's keen eye.

MY VERSION FOR THE FUN iPOD WAYS TO SING
  • POWER (black button)
    • How powerful can they sing with their voices without screaming or yelling by using their "powerful" singing voices. Have the child walk down the hall to see how far he/she can go and still hear the Primary sing. Emphasize strong or powerful singing voices, not yelling voices.
  • VOLUME (blue with black speaker) 
    • The children will sing louder or softer as the button is moved either up or down or side-to-side.  Just have three levels: high, medium or low. 
  • MUTE (blue with black speaker with "X")
    • When the mute button goes up, the children stop singing while the piano keeps playing and when the button is down, the children must pick up singing where the piano is.  You could have the pianist stop playing "out loud" then pick up singing/playing where the song would be when "unmuted" BUT it is easier for the children to follow in their heads and come in together if the piano keeps playing so it is really just the singing that gets "muted".
  • PLAY/PAUSE (orange with green pointer and 2 lines)
    • When the pause button is up, the children and piano stop and when the button goes down, the children and piano pick up where they left off singing.
  • FAST FORWARD (green with 2 blue pointers and line)
    • Sing faster when the button is held up and normal when down.
  • REWIND (green with 2 red pointers and line) Here are a few choices. 
    • Have the children make a complete turn to the left while continuing to sing each time the button is used.
    • Have the children switch between singing slower or normal when the button is up or down.
    • Have the children make a complete turn while singing slower. This is trickier so you may want to reserve it for the SR. 
    • Yeah, I know this activity doesn't have anything to do with singing backwards, but hey, if you and your kids are that talented, go for it—NOT.
  • MUSIC NOTE (large orange note)
    • Let the child or the child's teacher choose a favorite song. Let the child lead with the note on the stick.
  • RECORD (red with microphone)
    • Record the children singing and then play it back to them. Have the child hold the recorder. I used an app on my iPad, but I have used my iPhone, or a good old fashioned tape player still works.  Gee, I think I still have one of those around the house somewhere.  
  • SHUFFLE (blue with 2 crossing arrows)
    • Switch back-and-forth singing between sides of the room depending on which side the button is leaning towards.
    • Or, have the children lean left or right depending on which way the button is leaning.
    • Could also do both at the same time.
  • SONG TIME (screw head)
    • Let the child or a few children guess how long they think the song is going to take them to sing it then time them.  Let the child use a stop watch or a timer app on your iPhone/iPad/iPod. (I bet you can't tell I'm a Mac person.)
  • GO BACK (purple arrow)
    • Have the child use a bell and each time the child dings the bell, the children make a quarter or half turn while they are singing (specify up front which way they will be turning). If you don't have a bell, have the child do a loud clap with his/her hands. 
    • You could have the children sing to the back of the room; however, this does not involve the button controller to do anything unless you let them lead.
    • Another option is to let the child choose one time during singing to raise the arrow and when that happens, you start the song over.
    • Each time the child holds up the arrow, you sing the last word or two over and over again 3-4 times like a broken record. You may want to demonstrate this if you have never done this with your children before. This is a fun one, but make sure your pianist is okay with it or sing it a cappella.
    • One more option is to have the children move one chair over each time the arrow is raised.  This can be fun, but can get a little crazy.
  • SONG LIST (yellow square with 3 bullets and lines) 
    • Have three songs for the child to choose from, or
    • Have a child choose one of the program songs, or
    • Sing the song a cappella, or
    • Let the child choose their favorite song
    • Whatever song you sing, let the child help everyone clap to the rhythm of the song or let them lead with the stick or whenever the child holds up the stick with the button, you hum that part instead of singing it.

THE RULE OF 5
When you do an activity that allows a child to be in control of switching back-and-forth between actions or activity, such as loud vs softer, does that child love to switch back-and-forth between the actions quickly and often? HA!!! I knew I wasn't the only one with such fun-loving and rambunctious children!  Well, here is a helpful solution to that. I call it "The Rule of 5" (sometimes 3).  I remind the children that they can only switch in the song up to 5 times and they can't switch any faster than 5 seconds (one-one thousand, two-one thousand . . . .) If the song is a short song, I may change it to the rule of 3 or if it is longer, I may give them an extra 1 or 2.  I just tell them what it will be for that song; 3, 4, 5. . . . 

I have to tell you that for the volume one I had the song "The Wiseman and the Foolish Man" and the child who did this would bring the volume down on "the rains came down" and raise the volume on "the floods came up".  It actually sounded pretty cool and the kids really enjoyed that.  Just thought I'd share.

iPOD FILES

As I said before, this is a great, new twist for all those fun ways to sing while giving variety to singing time as well as getting in some repetition on the same song or reviewing several songs.